In Jeffersonville, old-wall repairs are rarely just about filling a crack. Many homes around Downtown, Riverside Drive, and the 47130 area have mixed substrates, older framing movement, and patch history that only shows up after primer. Historic drywall repair works best when the goal is not to make a wall “perfect” on paper, but to keep the room’s character while making the finish look clean in normal living light.
That difference matters. In newer construction, a standard patch sequence can work almost everywhere. In older homes, the same sequence can fail because the wall system is more complicated: older lath/plaster sections, legacy drywall, multiple paint generations, and prior repairs layered in different compounds. The result is that many “quick” patches look fine for two weeks, then reappear at exactly the angles homeowners notice first.
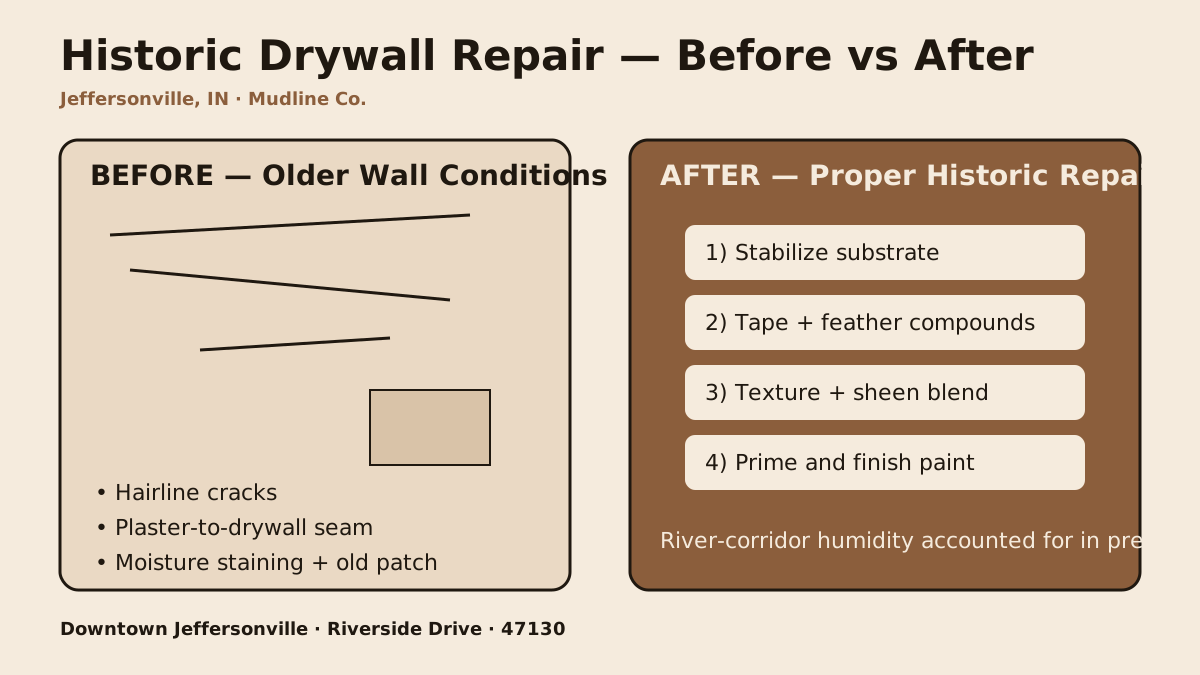
Why historic walls in Jeffersonville repair differently
Older Southern Indiana homes often have layered wall history: patched openings, legacy texture, sections of old plaster tied into newer drywall, and paint systems built over decades. A repair that would disappear in a newer tract home can telegraph in a historic room because the underlying surface is less uniform. We usually see four repeat issues in Jeffersonville jobs: movement at transition seams, moisture-influenced soft spots near exterior walls, over-sanded prior patches, and sheen mismatch after repaint.
If you only patch the visible defect and skip substrate checks, the crack often comes back in the same line within a season. If you patch too narrowly, side light catches the edge. If you prime only the patch and not the blend zone, paint can flash differently. Each of those is avoidable, but only when the plan starts with cause—not just cosmetics.
What we inspect first before any repair estimate
We do a room-level inspection so the repair scope matches the actual wall behavior. In Jeffersonville historic properties, that usually includes checking exterior-adjacent walls, old window perimeters, prior opening closures, and long seams that run through dining rooms or living rooms where raking light is strongest. We also ask what paint sheen you plan to use. A wall that can pass under flat paint may fail visually under eggshell or satin in the same room.
- Moisture status: Any active water risk has to be corrected before finish work starts.
- Movement status: We check whether cracks are static, seasonal, or tied to substrate transitions.
- Patch history: Older repairs are mapped so the new work doesn’t stack weak spots on weak spots.
- Light direction: Morning/evening side light determines how wide blending should go.
A field-tested sequence that protects character and finish quality
When we work on older walls, we follow a sequence built for preservation and finish control. First, we identify whether the issue is active (moisture, movement, loose substrate) or cosmetic (old patch profile, texture mismatch, paint sheen). Active issues get corrected before cosmetic work starts. Then we bridge transitions with the right tape/compound combination, feather wider than a standard patch radius, and evaluate under side light before priming.
This wider feather pattern is critical in older rooms where long light lines can reveal narrow patch edges. Finally, we blend texture and sheen so the repair reads as part of the wall instead of a separate island.
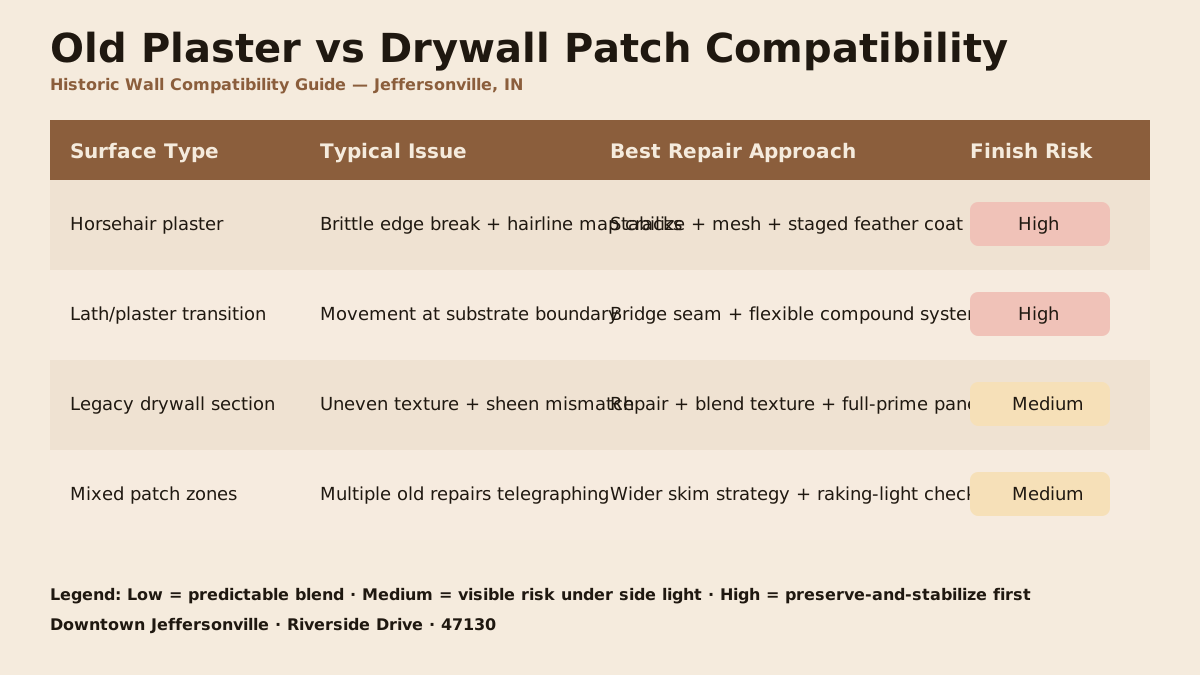
Common historic-home failure points (and how to avoid them)
Failure point 1: Patching over active moisture. If a wall still has moisture movement, finish materials won’t hold. Fix source conditions first.
Failure point 2: Treating plaster-to-drywall seams like standard drywall joints. Mixed materials need reinforcement and a wider transition strategy.
Failure point 3: Underestimating paint sheen. Smooth repairs under satin or semigloss can show edge contrast even when the patch itself is flat.
Failure point 4: Narrow blend zones. In older rooms, narrow feathering often creates visible halos once furniture lighting and daylight are back.
If the wall sits in strong side light near a front room window, ask for a wider blend or skim strategy up front. It is easier to do now than after furniture and artwork are back in place.
Moisture and crack diagnostics for river-corridor homes
Jeffersonville, New Albany, and Clarksville homes can experience seasonal moisture patterns that stress old wall systems. That does not mean repairs are unreliable—it means diagnostics must be deliberate. We separate structural movement from moisture-related movement and from pure finish-profile issues. Once those are separated, the repair scope gets much more predictable.
For older properties, this step is often what protects budget. Without diagnostics, homeowners can pay for repeat cosmetic fixes that don’t address why the line keeps returning. With diagnostics, the repair path is clearer and closeout quality is easier to maintain.

How to preserve historic look while still meeting modern expectations
Many Jeffersonville homeowners want two things at once: keep original room character and avoid obvious wall defects. Those goals are compatible when repair planning is intentional. We avoid over-leveling surfaces that should retain subtle historic variation, but we still enforce clean transitions, durable seam treatment, and paint-ready finish standards where visibility is highest.
That means not every wall needs the exact same finish level. A formal front room may need higher blend control than a utility corridor. A high-visibility ceiling seam may need more prep than a secondary closet wall. Good historic repair is selective and room-aware, not one-size-fits-all.
Budget planning for historic drywall repairs
Historic repair costs depend more on wall condition and finish requirements than on simple square footage. Two equally sized repairs can differ significantly if one includes mixed-substrate transitions, moisture history, or high-visibility lighting conditions. The best way to keep pricing predictable is to define scope around conditions: stabilization, seam reinforcement, blend width, texture match, and final paint prep expectations.
If you want a broader pricing framework, use our drywall cost guide as a planning baseline, then get a written scope for your specific room conditions.
Service-area context: Jeffersonville first, nearby support when needed
This article is focused on Jeffersonville historic properties, but the same methods apply across nearby Southern Indiana service areas. Projects in New Albany and Clarksville often share the same substrate transitions and humidity patterns. If you’re comparing contractors, ask specifically how they handle mixed old-wall materials and side-light finish quality. Those answers usually predict whether the patch will still look good six months later.
Final word for Jeffersonville homeowners
Historic drywall repair is not about pretending older walls are brand-new. It is about getting durable repairs that respect the home and look right in everyday use. When diagnostics, transition treatment, texture blending, and paint planning are done in the right order, old walls can read clean without losing the character that makes them worth preserving.
Planning a historic wall repair in Jeffersonville or nearby Southern Indiana? Send us the details and we’ll provide a written quote within one business day.