La Grange remodel projects often move through a familiar final stretch: trim is in, painters are lined up, the homeowner is walking rooms, and suddenly drywall details that looked “good enough” at coat stage become the loudest items on the punch list. That usually does not happen because the crew lacks skill. It happens because closeout decisions were not prioritized by visibility. The result is a lot of effort spent on low-impact areas while high-sightline defects stay exposed until the very end.
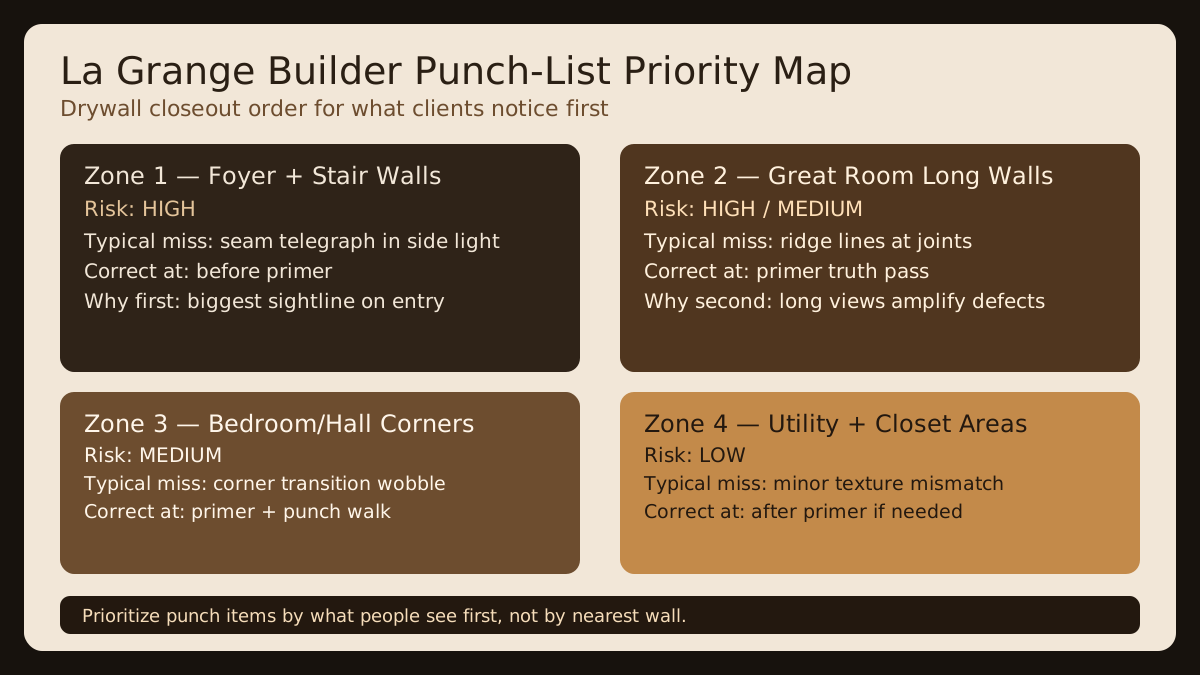
A better punch-list strategy starts with a simple rule: fix what people see first, not what is physically nearest. Entry walls, stair runs, long great-room planes, and doorway transitions should be inspected before utility walls and closet corners. When teams sequence work this way, painter handoff gets cleaner, homeowners experience fewer visual surprises, and final-week stress drops for everyone involved in the remodel.
Why punch lists fail when they are ordered by convenience
Many closeout crews naturally work by route: start in one room, move to the next, and clear items as they appear. That can feel efficient, but it hides risk. A low-visibility utility patch may get perfect attention while a foyer seam with strong side light receives only a quick touch. The checklist looks active, yet the biggest visual issues remain unresolved until the homeowner’s walkthrough reveals them.
In La Grange homes—especially older properties with mixed substrates and uneven framing history—drywall transitions can react differently from room to room. Some areas are forgiving. Others highlight every ridge line once primer and paint set in. Convenience-based sequencing misses that reality. Visibility-based sequencing aligns labor with outcome: where do the eye and light expose defects fastest, and what has to be corrected before painters lock the finish?
The four-zone closeout map for La Grange remodels
Start by dividing the house into four practical finish zones. Zone 1 is entry-impact space: foyer, staircase walls, and any surfaces people see at first glance. Zone 2 is long-sightline space: great rooms, dining walls, and connected hall runs where broad wall planes dominate. Zone 3 includes transition edges such as bedroom-to-hall corners and trim return lines. Zone 4 covers low-visibility utility spaces.
This map does not imply lower craftsmanship in Zone 4. It simply sets correction order. If a schedule compresses late in the week, the zones ensure the most visible surfaces still receive full attention before painter handoff. For remodel jobs, that sequencing is often the difference between a tight closeout and a callback cycle.
Paint-ready sequencing should be a gate process, not a guess
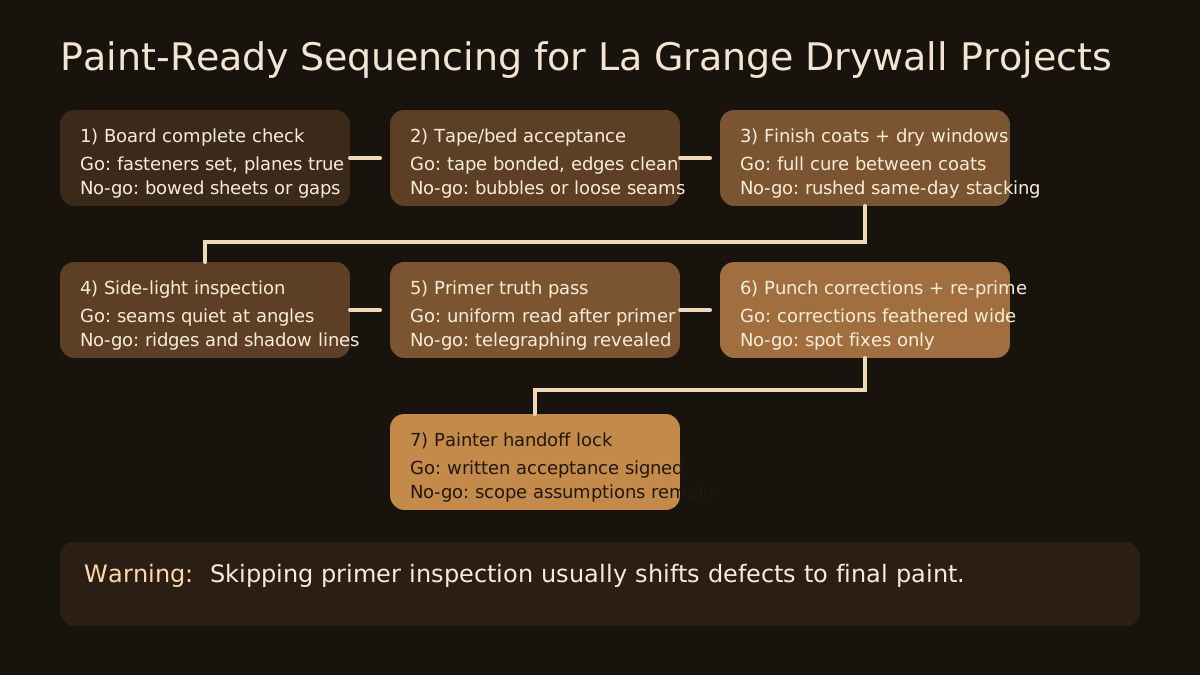
“Paint-ready” is one of the most misunderstood phrases on drywall jobs. Some teams use it to mean final sand completed. Others use it to mean primer has already validated the surface. Those are not the same threshold. In remodels, the only reliable paint-ready standard includes a gate sequence: board check, tape/bed acceptance, finish passes with proper dry windows, side-light inspection, primer truth pass, then punch corrections and re-prime where needed.
When that sequence is skipped, defects migrate downstream. A seam that looked minor before primer can flash heavily after paint sheen goes on. A doorway transition that seemed acceptable under work lights can show a visible halo in normal living light. Gate-based sequencing catches these while correction cost is still low.
Primer truth-pass: the checkpoint that prevents most callbacks
Primer is not just a painter’s first coat. In closeout planning, it is the truth layer that reveals what bare drywall can hide. Joint transitions, feather width, skim consistency, and texture density become far easier to judge after primer unifies porosity. If teams skip this checkpoint and move directly into finish paint assumptions, small defects become expensive fixes.
For La Grange remodels, where older wall sections often meet new board or repaired substrate, primer truth-pass is especially important. Different substrate absorption rates can exaggerate contrast and make patch borders visible. A controlled primer inspection before final paint allows targeted correction while access is still easy and before homeowner timelines are disrupted.
Old-house transition details need wider blends than new construction
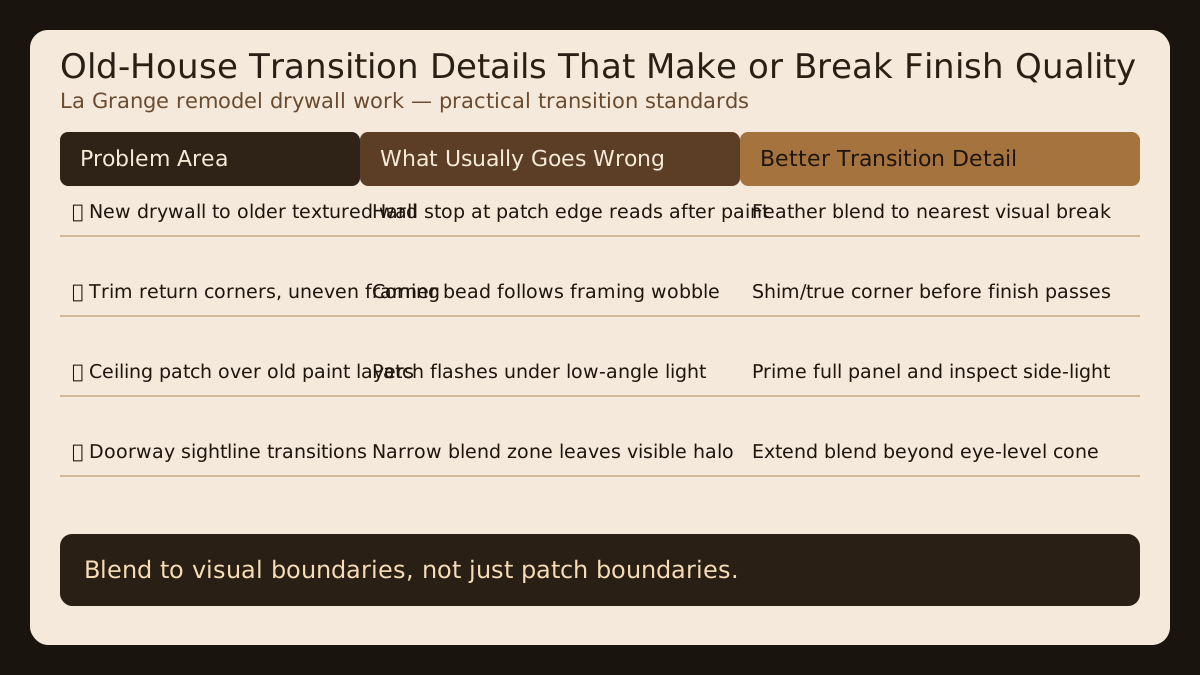
New-construction drywall often benefits from repeatable framing and consistent wall systems. Remodel drywall in older homes rarely has that luxury. Existing textures vary. Older paint films behave differently. Framing may be slightly out of plane at transitions. These conditions demand broader blend strategy and more intentional visual boundaries.
The most common mistake is blending only to the patch boundary. Technically, that may complete the repair area, but visually it can leave a ring, lane, or edge that catches light after paint. Better practice is blending to a logical visual stop: a corner, doorway break, trim line, or broader field transition where the eye naturally resets. This approach takes a little more prep and finish time, but it dramatically lowers post-paint visibility of repair work.
Builder and homeowner alignment before final walkthrough
Most closeout conflict comes from expectation drift, not bad intent. Builders may define acceptance by scope completion; homeowners define it by what they can see in everyday light. The fix is a short pre-close walkthrough protocol. Open blinds, use installed fixtures where available, stand at normal room entry and seating lines, and inspect major wall planes at practical viewing distance.
This avoids both extremes: unrealistic glare testing and overly casual pass-through. The goal is consistent, livable visual quality. If a seam or transition draws attention during normal viewing, it belongs on punch. If not, teams can move forward confidently instead of reopening settled rooms later.
Scheduling closeout around curing behavior, not calendar pressure
Late-stage remodel timelines tend to tighten quickly. But compound and skim behavior still follows moisture, airflow, and temperature—not calendar urgency. When finish coats are rushed without adequate dry windows, shrink and edge telegraphing are more likely, especially across repaired transitions. Those defects often appear just when painters are ready to finish, creating avoidable stackups.
A practical closeout schedule protects dry windows as non-negotiable gates. Complete pass, allow cure, inspect under side light, then advance. This may look slower on paper for a day, but it usually saves multiple days of correction once paint highlights the surface. In punch-list economics, controlled pace often beats frantic acceleration.
Documentation that keeps punch lists from re-opening
Short written closeout notes can prevent long arguments. Record which walls were inspected, what corrections were made, where re-prime was completed, and what was accepted for painter handoff. This is not bureaucracy for its own sake. It protects both builder and homeowner by anchoring decisions to a shared inspection moment.
On La Grange projects with layered remodel scopes, this documentation is especially useful when multiple trades touch the same rooms over several days. Without records, later damage or scope drift can get attributed to the wrong phase. With records, correction ownership stays clear and closeout stays focused.
How to run a 30-minute closeout walk that actually works
When schedules are tight, teams often skip a structured final walk and rely on informal room checks. That is usually where defects survive into paint. A better approach is a timed closeout walk with fixed steps: start at the front entry, follow primary sightlines, and inspect each major wall plane from normal viewing points before moving to secondary areas. Keep the same order every time so coverage is predictable and no high-impact surface gets skipped.
Use three pass types. First pass is visual scan under everyday lighting to catch obvious ridge, seam, and corner issues. Second pass is touch-and-angle confirmation for transitions around doors, trim returns, and patched ceiling fields. Third pass is handoff tagging: mark each issue as drywall correction, painter prep, or post-primer recheck. That simple categorization prevents confusion when multiple crews are on site and protects the timeline from scope ping-pong.
For homeowners, this process also creates transparency. Instead of hearing "we're almost done," they can see what was inspected, what was corrected, and what is queued for final primer verification. For builders, it creates a clear record that supports closeout quality without slowing momentum. In practical terms, a disciplined 30-minute walk can save multiple half-days of callbacks once final paint and furniture lighting expose the room.
Material and environment factors that influence final appearance
Not all closeout variation comes from workmanship alone. Relative humidity, airflow, substrate absorbency, and prior paint layers can all change how a repaired area reads after primer. Older La Grange homes frequently include mixed substrates in the same room—original plaster patches beside newer board sections, plus repainted surfaces with different sheen history. Those conditions make consistent finish behavior harder if teams assume every wall will react the same way.
The practical fix is to treat environment checks as part of closeout quality. Confirm airflow before final coats. Avoid compressing dry windows in rooms that are still holding moisture. Use primer inspection as the normalization layer before deciding a wall is truly complete. When crews account for these variables instead of forcing calendar speed, finish quality becomes more repeatable and remodel closeouts become far less reactive.
Final takeaway
For La Grange remodel drywall closeouts, the highest-leverage move is simple: prioritize visible zones first, enforce paint-ready gates, and blend transitions to visual boundaries. That sequence reduces callbacks, protects schedule confidence, and delivers the finish quality people actually notice after move-in.
Planning a La Grange remodel closeout? Send us your room list, timeline, and finish concerns and we will provide a written drywall scope and quote within one business day.