In Prospect and East Louisville custom-home builds, drywall finish decisions can quietly shape everything that comes after: painter performance, lighting perception, homeowner satisfaction, and the length of final punch. Most projects do not fail because the team cannot hang board. They struggle when finish expectations were never fully aligned between builder, drywall scope, and paint scope. A wall that looked acceptable at coat stage can suddenly read uneven once broad windows, can lights, and gloss levels start doing their job.
The growing trend we see in higher-end residential work is not simply “upgrade everything to Level 5.” It is targeted finish planning. Builders and homeowners want clean outcomes, but they also want scope clarity. Where does Level 4 still perform well? Which surfaces truly justify Level 5? What should be verified before the painter starts? Those answers save time and protect margins. This Prospect guide is built around real handoff decisions rather than spec-sheet theory.
What Level 4 and Level 5 actually change on a custom-home project
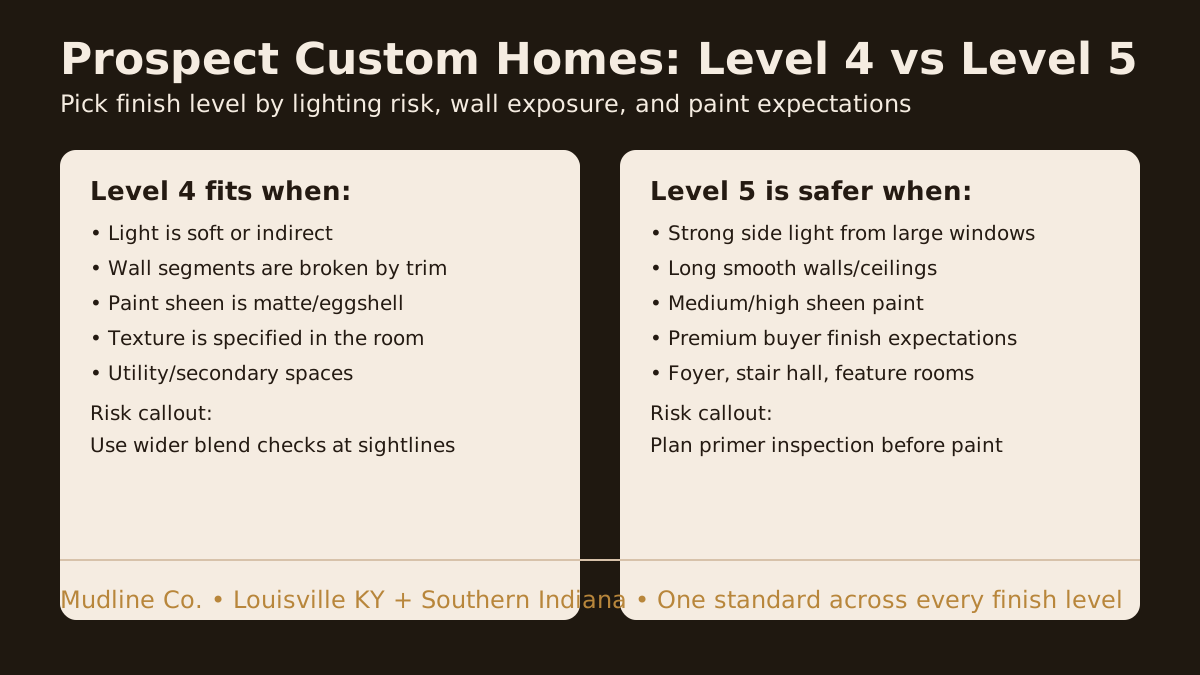
Level 4 and Level 5 are often discussed like a simple quality ranking. In practice, they are risk-control tools. Level 4 can deliver strong results when wall planes are stable, lighting is forgiving, and finish paint choices are compatible with standard drywall prep. Level 5 introduces a skim step that helps even out porosity and reduce joint telegraphing, especially across broad fields of smooth wall and ceiling where side light is aggressive.
Prospect homes frequently include design features that increase finish sensitivity: tall foyer walls, open stair volumes, long sightlines, oversized windows, and statement lighting. Those conditions do not automatically force Level 5 everywhere, but they increase the chance that borderline surfaces become visible defects after paint. The practical question is not “Which level is better?” The better question is “Where will visual risk be highest once the house is occupied?”
Critical-light zones should be identified before final finish coats
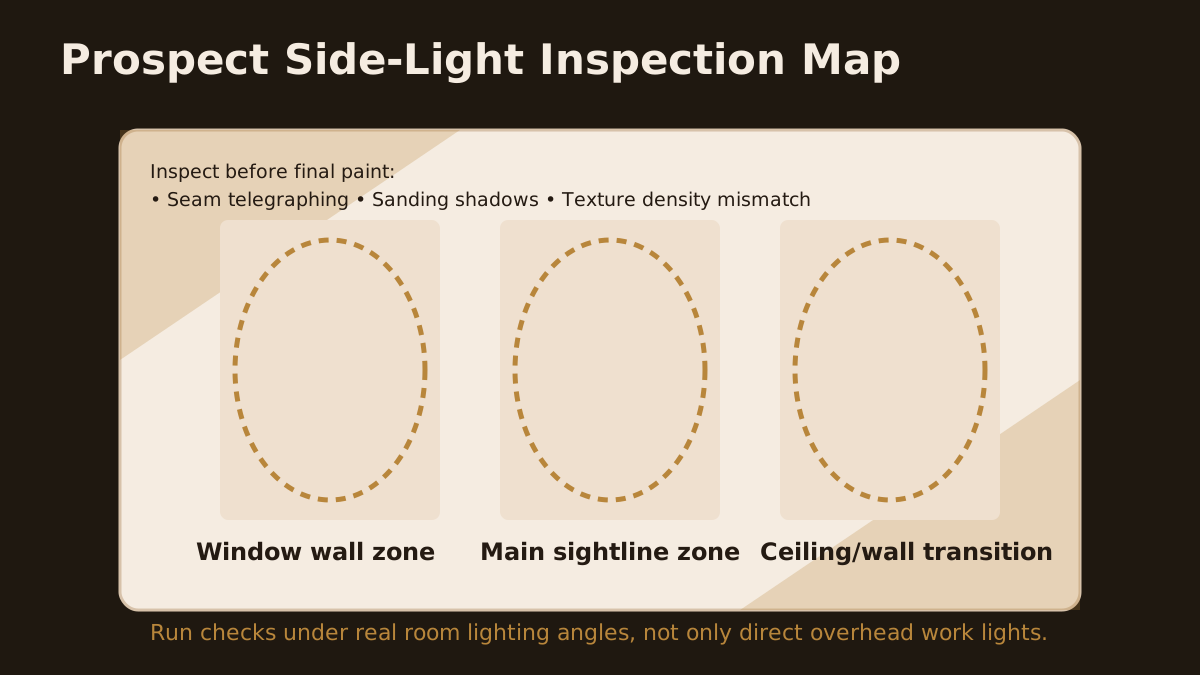
One of the most expensive mistakes in custom-home drywall is identifying critical-light zones too late. By the time painters are staged and punch walks begin, correcting finish strategy means resequencing trades and reopening completed work areas. Instead, map critical-light zones during planning and framing walk-throughs: large window walls, stair halls, ceiling runs with directional fixtures, and long corridors with low-angle natural light.
When those zones are tagged early, crews can plan texture and finish accordingly. Smooth-wall expectations under harsh side light usually push toward Level 5 or expanded blend control. Lower-risk spaces like closets, utility zones, or textured applications may stay efficient at Level 4. That targeted approach protects both schedule and quality while avoiding the false economy of blanket shortcuts or blanket upgrades.
Builder handoffs that reduce rework and late-stage confusion
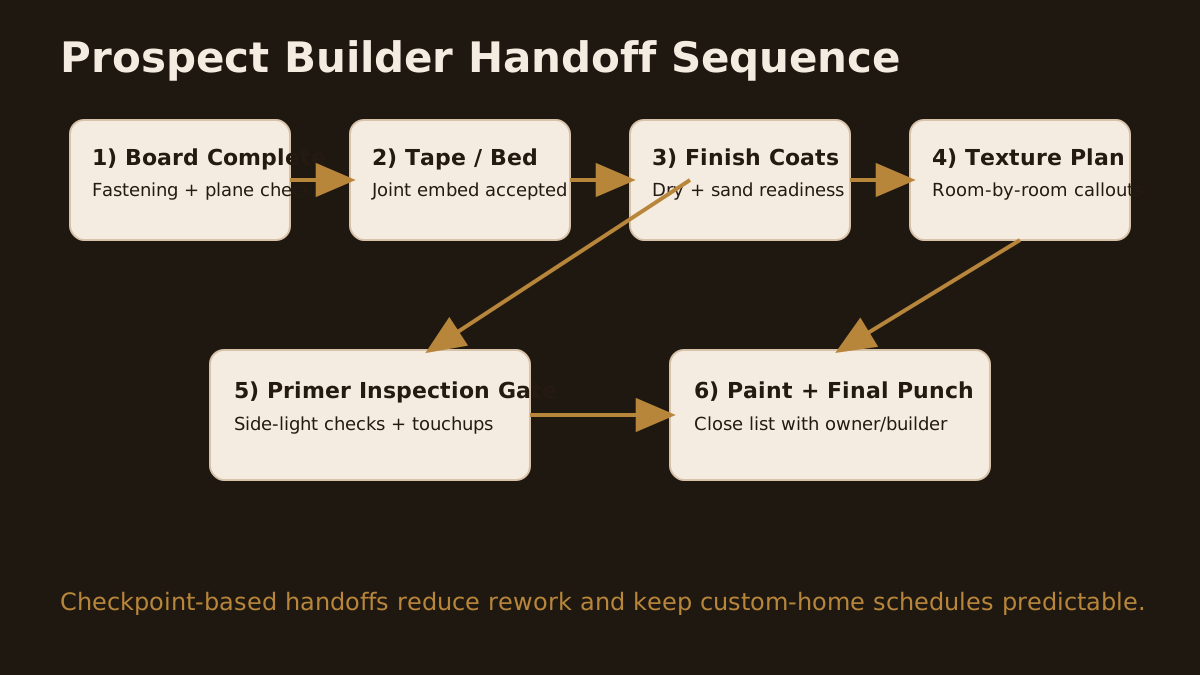
Drywall scope often drifts because handoffs are implied rather than documented. On high-spec homes, a cleaner pattern is staged acceptance. Confirm board complete and fastening standards. Confirm tape/bed complete. Confirm finish coats and sanding readiness. Confirm texture plan (if any). Confirm primer inspection and punch standards. Each stage should have a clear “ready” signal before the next trade assumes the surface is final.
This is especially important when builder crews, dedicated painters, trim installers, and homeowners are all interacting with the same rooms during compressed timelines. A small misunderstanding — like whether a wall is “paint-ready” versus “primer-ready” — can trigger finger-pointing and rushed corrections. Written handoffs keep scope anchored and make responsibility visible before quality slips.
Use one shared wall-by-wall finish legend for custom projects: L4, L5, texture type, and expected paint sheen. It prevents trade-by-trade assumptions from turning into punch-list callbacks.
Why paint sheen and primer choices belong in finish planning
Drywall finishing and painting are separate scopes, but they are visually linked. Higher sheens reveal more surface variation. Deep colors and directional daylight can exaggerate transitions. If finish planning ignores paint assumptions, even technically acceptable drywall work can get judged as a failure once the final coat goes on. The right move is coordination: confirm expected sheen by room and include primer inspection before final paint commitment.
Primer acts as the truth layer. It reveals subtle ridges, edge read-through, and texture density differences that were hard to see during dry sanding. On Prospect custom homes where final presentation standards are high, primer inspection should be treated as a quality gate, not a formality. Catching issues at this stage costs less than repainting and patching after move-in deadlines are already tight.
Scheduling for drying windows instead of calendar pressure
Many finish disputes start when the schedule is managed by target dates rather than material behavior. Joint compound and skim coats need appropriate dry windows that vary by humidity, airflow, and substrate condition. When those windows are compressed, shrinkage and edge telegraphing become more likely. In larger custom homes with varied HVAC status by phase, drying consistency can differ from room to room.
A practical schedule uses milestone windows rather than rigid same-day assumptions: complete pass, cure, inspect under light, and move to next stage. That sequence may feel slower in the moment, but it reduces late-cycle repairs that consume far more time. Builders who plan this way usually finish cleaner and hand off more confidently to paint and trim teams.
Custom-home punch lists: common drywall misses and how to prevent them
In Prospect projects, recurring drywall punch items include visible seam edges under stair or foyer lighting, inconsistent corner transitions where trim meets finished walls, and texture mismatch between adjacent rooms. These are rarely solved by one extra quick skim. They are solved by better zoning, clearer acceptance criteria, and earlier side-light checks before rooms become crowded with final finishes.
Another common issue is finishing too narrowly around repairs or adjustments requested by other trades. When a patch area is blended only to board edges instead of visual boundaries, it may pass up-close but fail at normal viewing distance. Extending blend zones to where the eye naturally rests — doorways, sightline transitions, or logical architectural breaks — gives a more durable visual result.
How homeowners can evaluate finish expectations before closing
Homeowners in custom builds are often seeing drywall at multiple phases without a clear baseline for what is temporary versus final. The best builder communication explains this early: taped joints are not finish, primer is inspection stage, and paint-ready means the substrate has passed agreed criteria under practical viewing conditions. This avoids unnecessary alarm mid-project while still preserving accountability for true defects.
If homeowners want elevated smooth-wall appearance in specific rooms — owner suite, dining, entry, or feature-wall zones — those preferences should be documented before finish scope is locked. Late preference changes are possible, but they are cheaper and cleaner when identified before the final pass. Clear communication keeps craftsmanship and expectations aligned.
Prospect and East Louisville context for finish-level decisions
Prospect homes often blend open-plan layouts, larger glass packages, and curated finish materials. That combination tends to reward disciplined drywall sequencing. When drywall, paint, and builder handoff standards are coordinated, final interiors feel intentional and consistent. When they are fragmented, small imperfections multiply visually across connected spaces.
The goal is not to upsell every wall to the highest spec by default. The goal is to put the right finish level in the right locations, keep scope language precise, and preserve schedule control without forcing shortcuts. That approach delivers a cleaner final presentation and reduces stress for everyone involved in the handoff.
Room-by-room finish mapping beats broad assumptions
On custom homes, one of the strongest planning tools is a room-by-room finish map shared by builder, drywall, and paint teams. The map should call out wall and ceiling finish levels, expected sheen, and any architectural features that change visibility — niches, trim transitions, coffered areas, and long hallways. When that map exists, crews can make finish decisions based on how each space will actually be viewed rather than relying on a single whole-house default.
This is also where change control matters. If a homeowner upgrades to darker paint, larger windows, or smoother wall expectations late in the build, the finish map should be revised before final coats proceed. A documented revision is faster and safer than trying to absorb major visual-spec changes during punch week. In Prospect projects with premium interior packages, this small process step usually saves multiple callbacks.
Pre-close walkthrough standards that protect everyone
Before closeout, schedule a drywall-and-paint readiness walkthrough using the same lighting conditions the home will live in. Open window coverings, use installed fixture circuits where available, and view primary walls from normal entry points and seating lines. The goal is not perfection under unrealistic glare tests; it is consistent quality under real occupancy conditions. Surfaces that draw attention at normal viewing distance should be addressed before final sign-off.
A clean closeout record should note which walls were inspected, what touchups were completed, and whether painter staging was aligned with final drywall status. This helps builders protect schedule integrity and helps homeowners understand what was finished when. Clear records reduce friction if questions surface later, and they reinforce the one-standard approach that keeps quality consistent across every room in the home.
Final takeaway
For Prospect custom homes, Level 4 vs Level 5 should be a planning decision, not a late-stage rescue. Mark critical-light walls early, align drywall and paint expectations in writing, stage handoffs with clear checkpoints, and verify under primer before final paint. That process protects quality, schedule, and the finished look buyers and homeowners actually notice.
Planning drywall finish scope for a Prospect custom-home project? Send us your plans, timeline, and finish goals and we will provide a written scope and quote within one business day.