Jeffersontown texture matching is a visibility problem before it is a patch problem
Jeffersontown homeowners call about drywall patches when they can still see where a repair was made days or weeks after paint. In many cases the repair itself is structurally fine. What remains visible is the transition between old and new texture under normal room lighting. Homes around Taylorsville Road, Watterson Trail, and the Blankenbaker corridor often combine open wall runs with directional daylight that exaggerates even subtle pattern differences. The patch is small, but the eye catches it immediately because the wall plane is doing exactly what light tells it to do.
This is why texture matching in Jeffersontown should be planned as a room-visibility task instead of a fast patch-only task. When teams treat the job as “fill, sand, spray, done,” results are unpredictable. When teams map where people actually stand, where light enters, and what sheen the final coat will use, blend decisions become more consistent. The difference between a quiet repair and a loud repair is usually not product choice alone. It is scope discipline before the first coat goes on.
Why repaired drywall shows up after paint even when workmanship seems solid
Homeowners are often surprised when a wall looks acceptable before final paint and then shows a distinct repair outline after topcoat. This happens because primer and finish sheen amplify micro-transitions in depth and texture frequency. A patch that appears uniform under overhead work lighting can still flash under side light from windows or patio doors. In other words, your inspection method can hide the same issue your daily living light reveals.
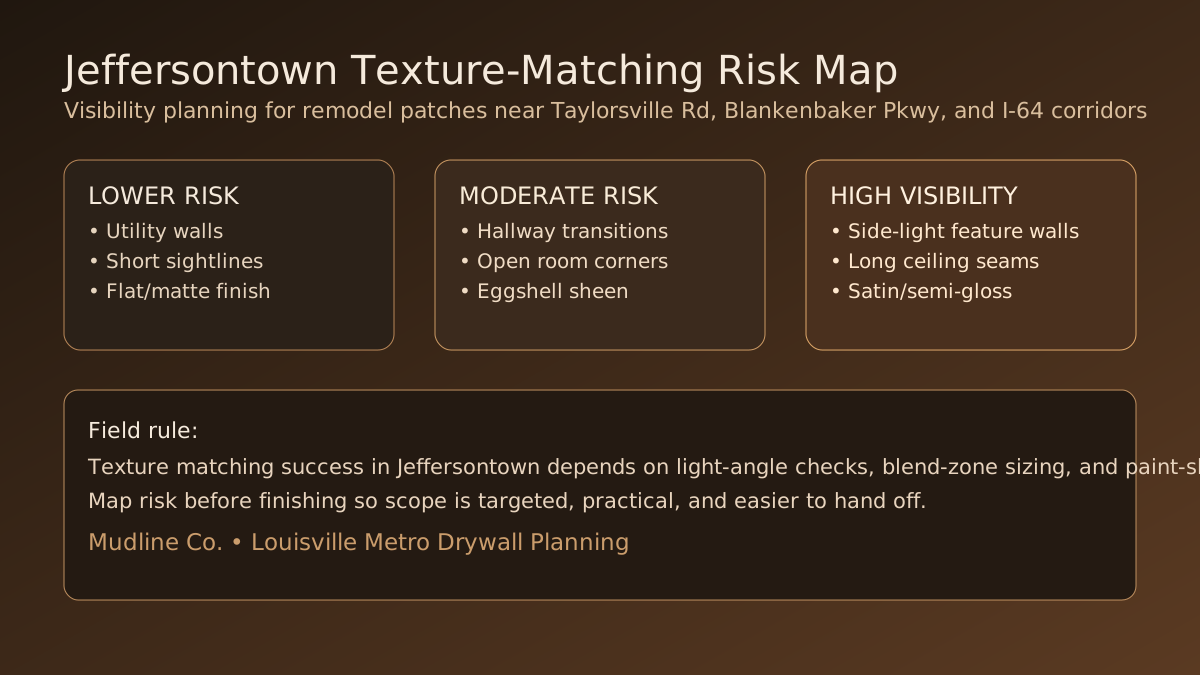
In Jeffersontown remodel work, this pattern is common near open living spaces and hallway transitions where one long angle views the whole wall at once. If a texture edge is too abrupt or a feather zone is too narrow, the wall reads as a boundary instead of a continuous surface. Correcting that after final paint is always slower and more expensive than controlling it in sequence before handoff.
Texture profile identification: the first quality gate
Texture matching begins by identifying the existing surface profile with practical accuracy: pattern size, depth variation, directional rhythm, and peak-to-valley softness. Misidentification by even one profile family can make an otherwise clean patch visible from across the room. Teams should also note whether the surrounding area has prior repaint buildup, because extra coats can soften the old pattern and change how new material needs to be blended.
For Jeffersontown homes with multiple renovation eras, two adjacent walls may carry different historical texture behavior even if they appear similar at first glance. Running a quick test patch in a lower-visibility segment and checking it after primer is often faster than rushing full application and then chasing corrections. That short test loop reduces risk and gives everyone a real reference before broad repair passes begin.
Blend-zone sizing is where most patch jobs are won or lost
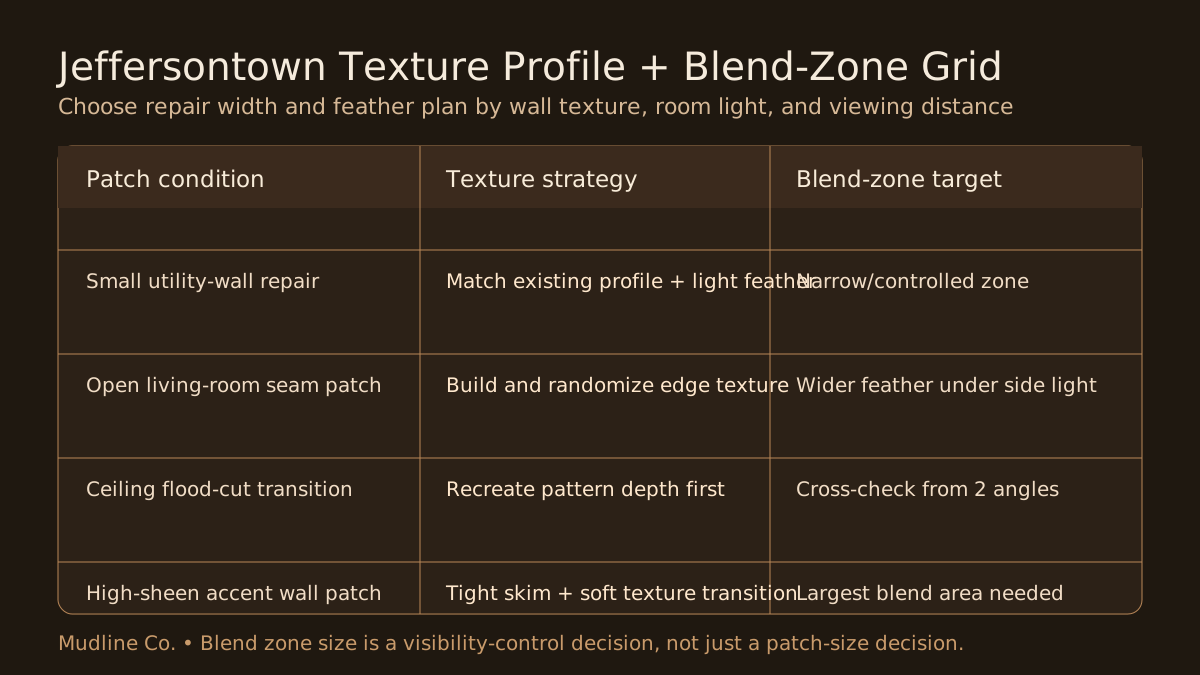
The blend zone should be sized by visibility and light behavior, not only by the dimensions of the damaged area. A narrow patch can still require a broader transition if the wall catches hard side light or finishes in a reflective sheen. Conversely, a slightly larger patch in a low-visibility room may close out cleanly with a tighter edge. One-size blend rules fail because room conditions are never one-size in real houses.
On Jeffersontown jobs, this matters most in family rooms, entry transitions, and ceiling fields where people naturally look across rather than straight at the wall. Broadening the blend intelligently, softening perimeter texture cadence, and checking from two sightlines usually outperforms repeated small touchups. The goal is to remove visual boundaries, not merely to hide tool marks.
Sheen and primer coordination should happen before final pricing is accepted
Paint sheen can make a technically acceptable patch either disappear or stand out. Flat and matte are more forgiving. Eggshell reveals more. Satin and semi-gloss can expose subtle transitions quickly. If sheen expectations are discussed only after drywall scope is set, repair plans can become misaligned with the actual finish environment and callbacks become more likely.
A better approach is to include sheen assumptions in the written quote from the start. For Jeffersontown homeowners and project managers, that means confirming finish expectations room by room, not with a generic single line item. When sheen, texture strategy, and blend-zone width are aligned up front, painters inherit a cleaner surface and projects move to closeout with fewer surprises.
Occupied-home logistics: honest dust control beats unrealistic promises
Drywall is a dusty process, even on well-managed repairs. Customers are better served by direct expectations and practical containment than by “dust-free” language that no field crew can guarantee honestly. Effective containment includes plastic barriers, floor protection, controlled sanding methods, and daily cleanup checkpoints that keep adjacent areas usable while work continues.
In Jeffersontown occupied homes, communication around access windows, furniture staging, and end-of-day reset points is just as important as technical texture work. When homeowners know where crews will be, how transitions are protected, and what completion checks look like, trust stays high and the repair process feels organized rather than disruptive.
Ceiling texture transitions require different risk assumptions than wall patches
Ceiling repairs tend to draw attention differently than wall repairs because people catch them from broad peripheral views and under mixed artificial lighting. A patch line that seems minor on a ladder can still read strongly from the room perimeter, especially when fixtures cast cross-angle shadows. This is why ceiling blend strategy should include checks from floor-level viewing positions before paint starts.
Jeffersontown ceilings in open-plan rooms often combine vents, can lights, and long seams that create repeated visual anchors. Matching depth first, then softening cadence at the blend edge, generally performs better than trying to duplicate exact spray density in a single pass. Multi-pass control usually looks more natural once primer unifies the field.
Remodel tie-ins and legacy surfaces: avoid false uniformity assumptions
Legacy walls frequently carry subtle movement, old repairs, and paint-film variation that make perfect geometric texture replication unrealistic. Good work does not pretend every square foot was built yesterday. Instead, it aims for visual continuity from practical viewing angles and aligns quality checks to how the room is actually used.
For Jeffersontown remodels with additions or phased updates, documenting tie-in boundaries early helps prevent “who owns this transition” confusion later. If drywall and paint teams agree on acceptance route, touch-up window, and final review conditions before topcoat, accountability stays clear and corrections stay small.
What to send for a faster Jeffersontown texture-matching quote
If you want a stronger quote on first pass, send one full-room photo, one close-up of the damaged area, and one side-light angle if available. Add the room’s paint sheen target, occupancy status, and timing window. Mention if water damage, prior patches, or recent electrical/plumbing cuts are involved, because those factors change both sequencing and blend strategy.
Local orientation notes help too. If you know which wall gets strongest morning or late-day light, include that in your message. The more accurate the intake, the more practical the written scope can be for Jeffersontown conditions instead of generic assumptions that may not fit the actual room behavior.
Repair-to-paint handoff: keep the quality gate explicit
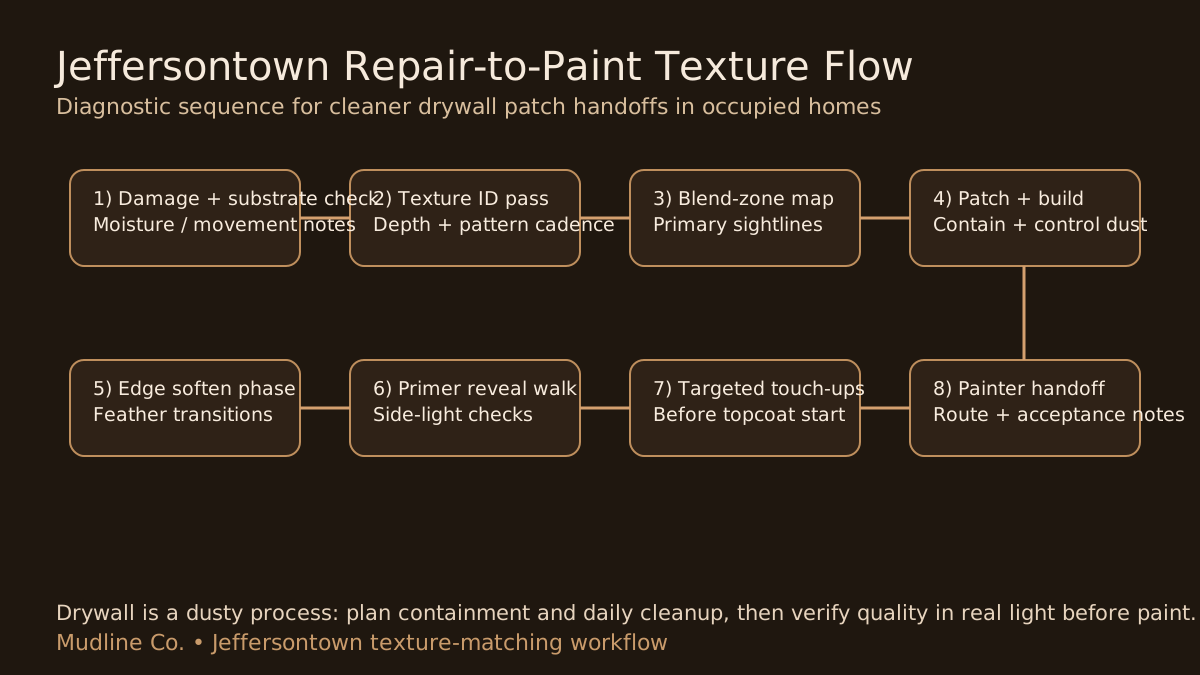
A reliable handoff sequence is straightforward: diagnose substrate, identify texture profile, map blend zone, execute controlled patch/build, run primer reveal checks in real angles, then complete targeted touch-ups before final topcoat. Skipping one of those gates often pushes the same work into a more expensive stage where schedule pressure is highest.
In Jeffersontown jobs, the biggest handoff mistake is treating primer as a formality. Primer is the most useful checkpoint for revealing transition behavior before the final aesthetic layer goes on. Teams that treat it as a true quality gate usually deliver cleaner closeouts and fewer post-paint call-backs.
Bottom line for Jeffersontown drywall texture repairs
Quiet repairs come from planning, not luck. When texture profile, blend-zone size, sheen expectations, and light-angle checks are coordinated early, patch transitions stay far less visible after paint. That makes the room look finished instead of “recently repaired,” which is the result homeowners actually want.
If you need texture-matching drywall repair in Jeffersontown, Mudline can review photos, identify visibility risks, and provide a written scope built around practical handoff checkpoints. The goal is straightforward: controlled process, honest expectations, and cleaner paint-ready outcomes with fewer surprises.
Jeffersontown texture-matching FAQs
Why do drywall patches show after paint in Jeffersontown homes?
Most visible patches come from texture edge transitions under side light or sheen, not from structural failure. Blend-zone sizing and light-angle checks are key to cleaner results.
Do all texture-matching repairs need a large blend zone?
No. Blend width should match visibility conditions. High-glare, long-sightline walls usually need broader feathering than low-visibility utility areas.
Can Mudline work in occupied Jeffersontown homes?
Yes. Drywall is a dusty process, so we use containment, floor protection, and daily cleanup to keep disruption managed while repairs move forward.
What helps me get a faster written drywall repair quote?
Send full-room and close-angle photos, plus a side-light photo if possible, then include sheen target, occupancy status, and timeline so scope can be matched to real room conditions.