In St. Matthews, drywall finish decisions are usually made twice. The first decision happens before mud ever touches the wall, when a homeowner or builder asks, “Do we really need Level 5 here?” The second decision happens after primer, when strong window light answers that question for everybody in the room. If those two decisions do not match, the project ends up paying for corrections at the most expensive point in the schedule.
That pattern is common in neighborhoods around Shelbyville Road, Brownsboro Road, and Chenoweth Lane where remodels blend older wall sections with fresh drywall and modern paint palettes. A wall can be structurally solid and still feel unfinished if side light reveals subtle transitions. The point of planning Level 4 versus Level 5 is not to sell the highest option in every room. The point is to place the right finish where visibility risk is highest and protect budget where it is not.
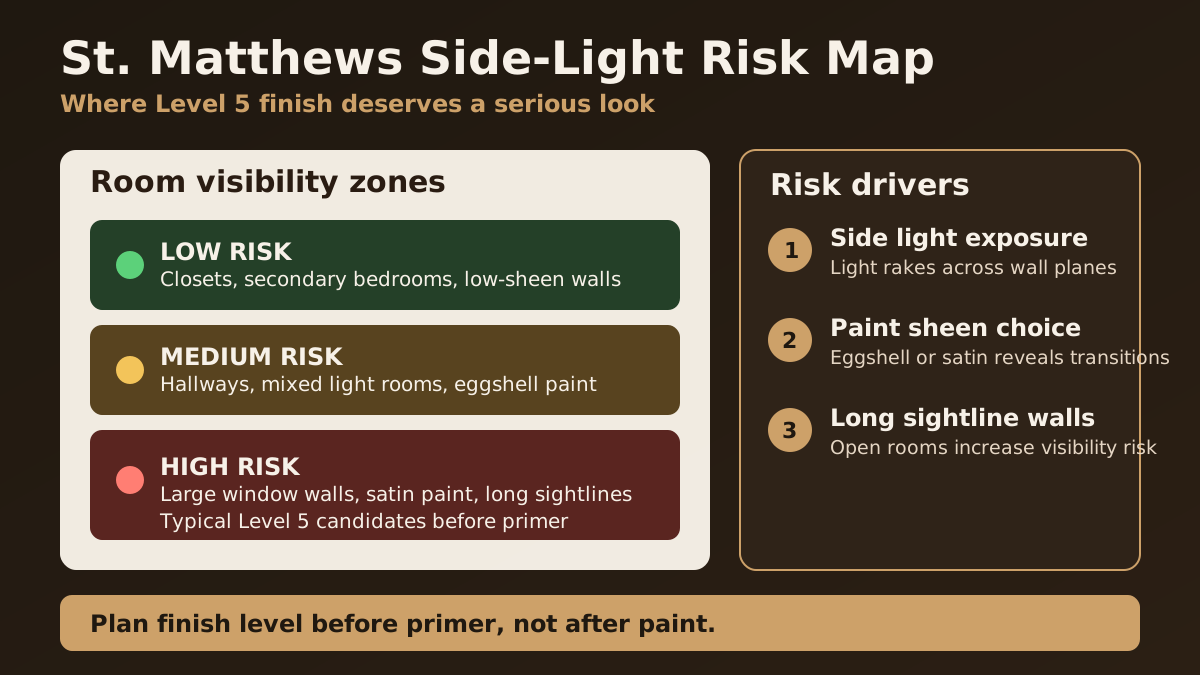
Level 4 and Level 5 are not quality grades — they are risk controls
Homeowners sometimes hear “Level 5” and assume Level 4 is lower quality. In reality, Level 4 is a professional standard used on countless successful projects. Seams are taped, joints are coated, fasteners are covered, corners are finished, and the wall is sanded and prepared for primer. Where light is forgiving and finishes are practical, Level 4 performs well.
Level 5 adds a skim coat across the full surface to reduce differences between paper and compound areas before paint. That extra uniformity helps where light skims across smooth walls and where sheen paint exaggerates minor texture or absorption differences. So this is less about “good vs best” and more about “standard risk vs elevated risk.” If the room has elevated visibility risk, Level 5 can prevent callbacks and buyer disappointment.
Use room conditions, not room names, to decide
It is tempting to choose one finish level for an entire house because that keeps scope simple. But simple scopes can be expensive when they ignore actual room conditions. A better approach is room-condition planning. Start with three questions: How does light move through this room? What paint sheen is planned? How much uninterrupted wall plane will people see at once?
A guest bedroom with flat paint and broken wall lines may be a straightforward Level 4 room. A connected kitchen-living space with satin paint, under-cabinet lighting, and long sightlines is usually a stronger Level 5 candidate. The same house can support both choices if the scope is built intentionally. Mixed scopes are often the most cost-effective way to hit finish expectations.
What side light changes in real projects
Raking light is not just bright light. It is light traveling across a surface at a shallow angle, which makes tiny elevations and texture differences visible. That is why walls can look smooth at noon and show seam shadow at 6 PM. In St. Matthews remodels with larger front windows, open floor plans, and reflective trim packages, raking light tends to expose transitions between old and new work.
Teams that account for side light early make different choices: wider feather zones on repairs, cleaner edge transitions where new drywall meets old surfaces, and more conservative recommendations for sheen paint in high-risk rooms. Those decisions happen before painter mobilization, when fixes are still cheap and schedule-safe.
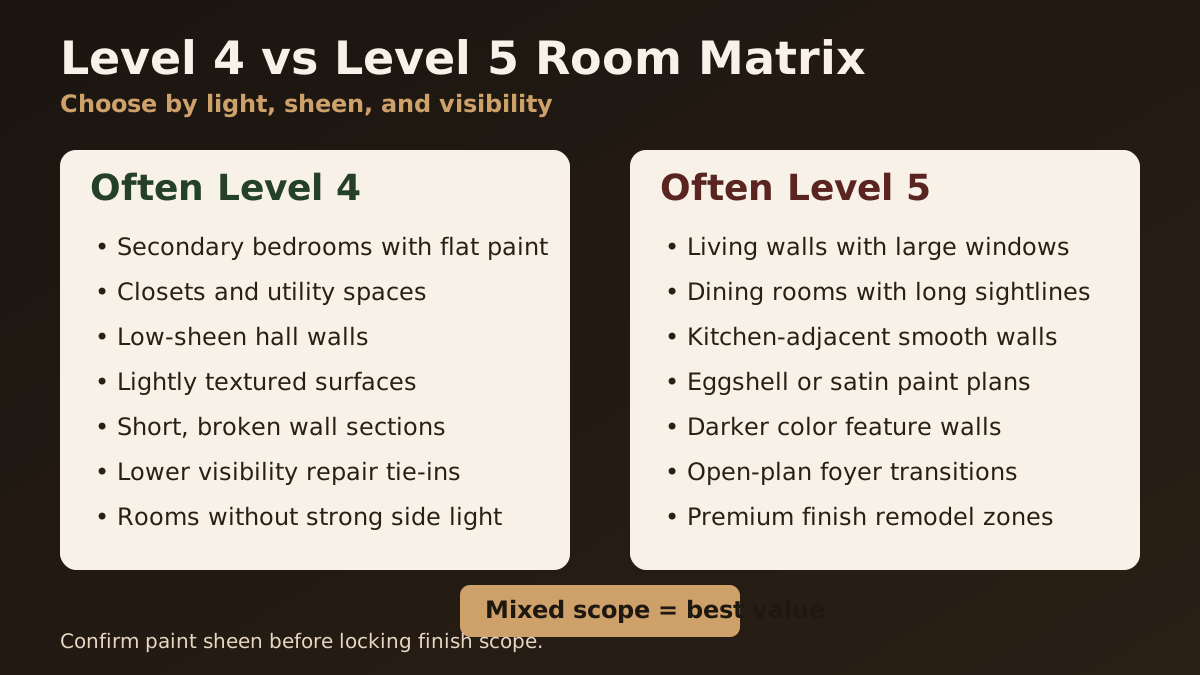
Paint sheen can quietly change the drywall budget
Finish planning often underestimates paint selection. Flat and matte coatings usually hide more surface variation than eggshell, satin, or semi-gloss. As sheen goes up, walls become less forgiving. If the design brief calls for smooth walls with richer paint or washable finishes, drywall planning must move with it. Otherwise the paint package can reveal details the drywall scope was not designed to hide.
This is why finish-level decisions should be coordinated with painter intent, not decided in isolation. A wall that is acceptable for flat paint can become a headache with satin. Builders who lock this coordination in prepaint meetings usually avoid the “who owns this finish issue?” conversation at closeout.
Builder handoffs: where projects either stay clean or get messy
Many finish problems are not technical failures. They are handoff failures. One trade assumes another trade will absorb variation. A painter expects final surfacing beyond the original drywall scope. A superintendent expects visual outcomes that were never specified by wall zone. Without written handoff criteria, teams can disagree while the schedule gets tighter.
A practical handoff standard should identify: targeted finish level by room or wall, expected paint sheen, critical-light walls, and the inspection position used for acceptance. If nobody defines where inspection happens, teams inspect where they personally stand — and those standards rarely match.
On high-visibility walls, define a short acceptance walk route before paint: room entry, main seating angle, and window-side return path. If a wall passes those views after primer, surprises drop fast.
Repair tie-ins need the same planning as full walls
Level planning is not only for new board. St. Matthews remodels regularly involve tie-ins from electrical changes, doorway shifts, cabinet rework, and prior repairs. Those transitions are exactly where walls can telegraph after paint. A small repair area may still need broader finishing strategy if it sits inside a high-visibility light path.
For tie-ins, the scope should describe the blend strategy clearly: repair core, feather zone, and inspection method. A minimal patch that is “technically complete” can still create a visible target under evening light. Spending slightly more on transition control up front is cheaper than repainting and reworking once the room is furnished.
How homeowners can send better quote info
Better photos lead to better finish recommendations. Send one straight-on image of the full wall, one close image of the affected zone, and one angle showing how light crosses the surface. Include notes about planned paint sheen and whether the room is currently occupied. If possible, provide the time of day when the wall looks worst; this usually points directly to side-light risk.
For St. Matthews projects, local context helps with schedule planning too: room access, parking constraints, occupancy during workdays, and whether painter dates are already fixed. The more complete the context, the easier it is to produce a written scope that aligns drywall and paint expectations before work starts.
Dust planning should stay honest and explicit
Drywall is a dusty process, and finish upgrades do not change that basic truth. Skim and sanding work can increase fine dust load if containment is loose. Good planning uses work-zone barriers, floor protection, controlled routes, and daily reset practices so occupied homes remain manageable during the project.
The right message is straightforward: expect some dust, but expect disciplined containment. That honesty helps homeowners prepare rooms correctly and reduces friction when the schedule is tight.
Room-by-room scope examples that usually work
On many St. Matthews remodels, a practical blended scope looks like this: Level 5 on primary living walls, dining rooms with strong windows, kitchen-adjacent smooth walls, and long foyer runs; Level 4 on secondary bedrooms, closets, utility spaces, and lower-risk transition walls. This kind of split can protect appearance where it matters without inflating every square foot.
Of course, every project is different. Historic framing movement, prior patch history, or aggressive sheen targets can shift recommendations. The key is to scope deliberately instead of defaulting by habit.

St. Matthews Level 4 vs Level 5 FAQs
Do all St. Matthews rooms need Level 5 drywall finish?
No. Level 5 is most useful where strong side light, smoother paint, and long sightlines can reveal seams. Many secondary rooms still perform well with a properly executed Level 4 finish.
What makes drywall seams show after paint in bright rooms?
Seams can show when light rakes across the wall and the paper field absorbs paint differently than joint-compound areas. Sheen paint and dark colors increase visibility of those transitions.
Can a project mix Level 4 and Level 5 by room?
Yes. Mixed scopes are common. High-visibility walls can be upgraded to Level 5 while lower-risk rooms stay Level 4, balancing appearance goals and budget.
Does Mudline provide written finish recommendations before paint?
Yes. Mudline can review room lighting, paint plans, and wall conditions in St. Matthews and provide a written finish recommendation with quote options.
Final takeaway
In St. Matthews, Level 4 versus Level 5 is a planning decision, not a prestige badge. Put Level 5 where side light, sheen, and long views increase visibility risk. Keep Level 4 where walls are naturally more forgiving. Coordinate that plan with painter intent and write the handoff criteria before primer. That approach protects finish quality, schedule, and budget at the same time.
Need a finish recommendation for a St. Matthews project? Send room photos and paint plans and Mudline will provide a written quote and scope guidance within one business day.