New Albany drywall installation work is rarely a clean-slate production build. Most calls involve additions, room conversions, insurance-related rebuild areas, or partial interior updates where old and new construction have to meet without obvious seams. Homes near Spring Street, Grant Line Road, Charlestown Road, and neighborhoods feeding to I-64 often carry mixed conditions: one section with fresh framing, one section with legacy framing drift, and one section that has already been patched two or three times. That mix is exactly why installation planning has to happen before board goes up.
The goal is simple: install drywall once, then hand off a predictable paint-ready surface. The path to that goal is not complicated, but it does require sequence discipline. Framing has to be checked, backing has to exist where transitions will happen, rough-ins have to be closed, and moisture risk has to be understood. If those steps are skipped, everybody downstream pays for it with rework, callbacks, and delayed painter starts.
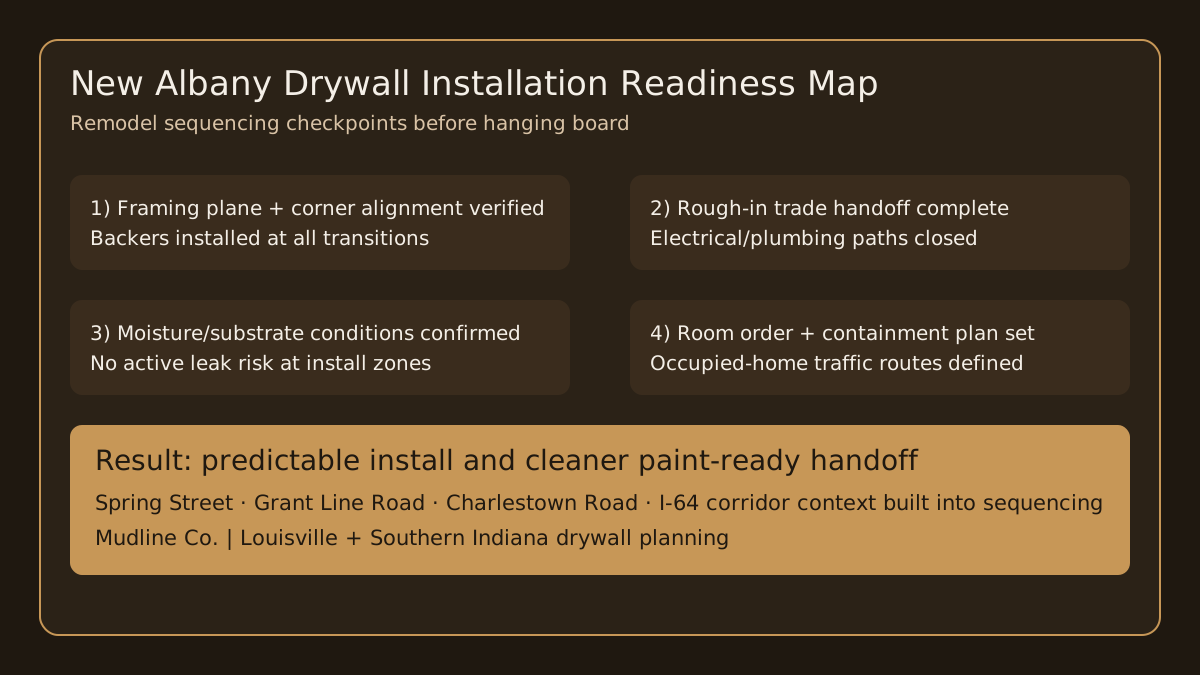
Why sequence matters more in remodels than in new builds
On new construction, trades usually move in a predictable order with cleaner wall cavities and fewer legacy surprises. In remodels, walls are often opened in stages and conditions evolve. A framing correction may be discovered after electrical changes. A plumbing adjustment may land in a location already discussed for board layout. Window swaps can change return details and reveal line quality. If drywall starts before those variables settle, the same area can be cut, patched, and re-finished repeatedly.
A tighter sequence avoids that churn. It aligns trade handoffs around objective checkpoints: framing straightness, backing at transitions, rough-in closure, insulation status, and room-by-room install order. That planning is not paperwork theater. It is what keeps a Tuesday board day from becoming a Friday patch day.
Framing checks that prevent visible finish problems later
Drywall finish quality starts with framing geometry. Walls do not need to be mathematically perfect, but they do need to be within a workable plane. Crowns in studs, out-of-plane corners, and uneven blocking lines can telegraph through board and become more obvious after primer and side light. In older New Albany homes, transitions between existing and new framing often need extra attention because dimensions and lumber behavior differ across eras.
Before install, verify stud plane, corner alignment, soffit depth consistency, and backing at all board ends. Check high-visibility zones first: hallways with long sightlines, stair walls, and window-adjacent walls where late-day light rakes across surfaces. Those are the areas where minor framing inconsistency becomes major customer frustration. Fixing these conditions before hanging is cheaper than trying to hide them with excess compound later.
Board layout decisions are not random
Board layout is where installation strategy meets finish strategy. Seam locations, board orientation, and transition placement affect crack risk, labor flow, and final appearance. Good layouts minimize unsupported joints, avoid stacking seams in critical light paths, and reduce avoidable butt joints in feature walls. In remodels, layout also has to respect existing trim lines, casing returns, and tie-ins to older surfaces.
Ceiling-first versus wall-first sequencing should be chosen intentionally based on access, room staging, and adjacent work. For many occupied-home remodels, room-level sequencing with controlled zones keeps homeowner disruption lower and helps maintain dust containment. The key is committing to a documented room order so other trades and painters can plan confidently.
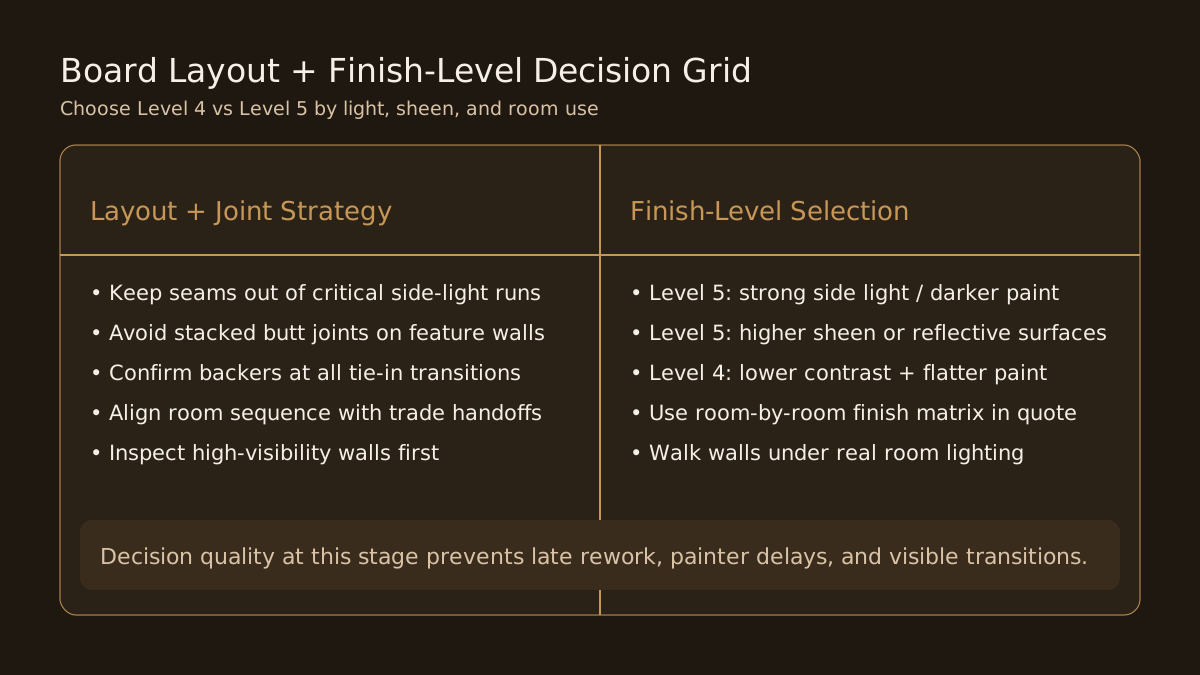
Level 4 vs Level 5 should be selected by lighting and sheen
The best finish level depends on where and how the wall is viewed. Level 5 is often the safer choice for rooms with strong side light, darker paint colors, or higher sheen finishes that exaggerate minor surface variations. Level 4 can perform well in lower-contrast spaces with forgiving light and flatter paint systems. The point is not to upsell; it is to match finish scope to visual risk.
In New Albany remodels, common trigger points for considering Level 5 include long corridor walls, living areas with large window banks, and ceilings with directional LED layouts. For lower-risk walls, a disciplined Level 4 with proper sanding, cleanup, and primer coordination may be entirely appropriate. A room-by-room decision matrix keeps scope practical and expectations clear.
Moisture and substrate checks are installation gates, not afterthoughts
Some remodel areas are technically ready for board but not environmentally ready. Exterior-wall histories, past leaks, or seasonal humidity shifts can create hidden risk if moisture conditions are ignored. This is especially relevant in projects where a damaged section was opened, dried, and rebuilt over several weeks. Moisture confirmation and substrate stability should be explicit gates before install.
If a room has recent water history, verify source control first, then verify dry conditions, then proceed. Boarding over uncertainty often creates delayed staining or adhesion issues that appear after paint. That sequence is not alarmist; it is routine risk control and one of the easiest ways to avoid callbacks.
Trade handoffs: what “ready for drywall” should actually mean
Drywall crews lose time when “ready” means different things to different people. A stronger handoff definition makes schedule performance more predictable. At minimum, “ready for drywall” should mean rough electrical and plumbing are complete in the install zone, inspection status is clear, insulation plan is confirmed, framing adjustments are resolved, and access paths are open for board movement.
For additions and partial remodels, define boundaries by room, not by vague square footage. Room-based boundaries reduce confusion when one area is delayed but adjacent rooms can proceed. That approach also helps homeowners understand where dust barriers, staging, and daily cleanup will occur.
On mixed old/new walls, mark transition lines before board day and verify backing at every planned transition. Transition clarity is one of the biggest predictors of clean final paint lines.
Paint-ready sequencing that protects everyone’s schedule
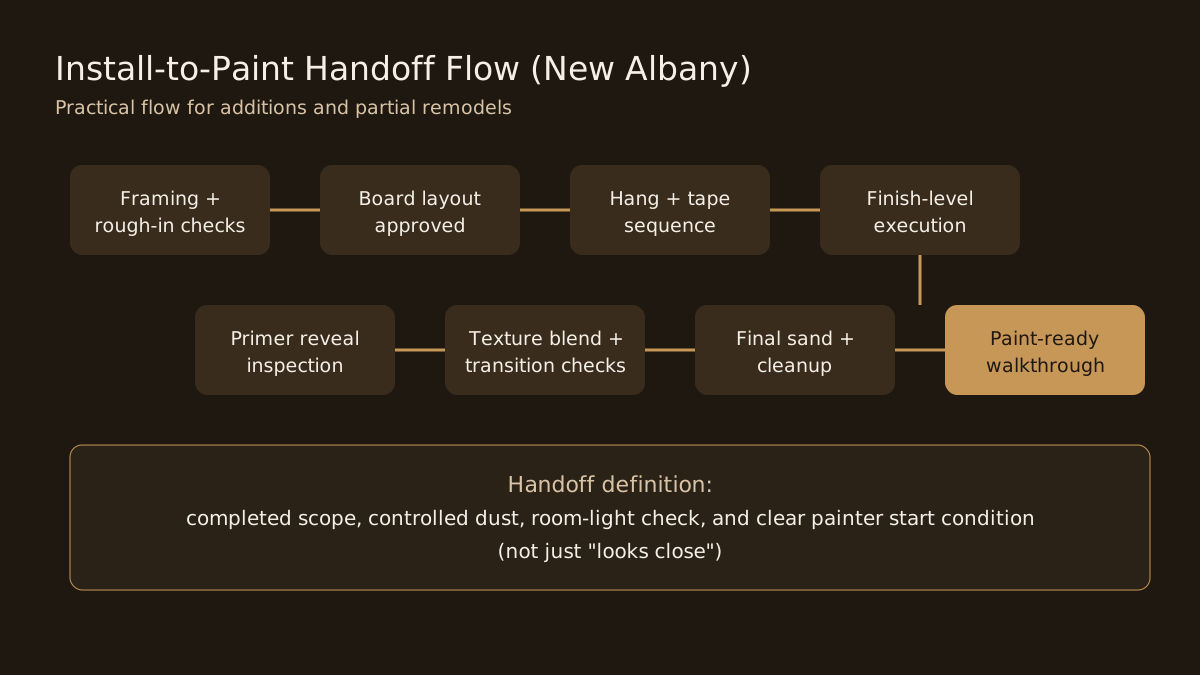
“Paint-ready” should never be treated as a vague milestone. It should describe a specific sequence: board install complete, tape and finish coats complete, final sanding and dust removal complete, transitions checked under real room light, and scope walk-through done before primer. Painters can still perform their own prep preferences, but a defined drywall handoff eliminates avoidable ambiguity.
On projects with tight occupancy constraints, this sequence also supports realistic communication. Homeowners can plan around contained work zones, builders can stage follow-on trades, and painters can book starts with fewer surprises. The schedule impact is substantial because every trade downstream depends on a stable wall surface condition.
Dust expectations for occupied New Albany homes
Drywall is a dusty process, and good planning should be honest about that. The objective is controlled dust, not imaginary zero-dust promises. Plastic barriers, floor protection, staged work paths, and daily cleanup significantly reduce spread, but some dust is still part of the process. Clear expectations early prevent frustration later.
In occupied remodels, containment planning should include tool staging zones, debris movement routes, and end-of-day reset standards. This is especially important when families are living in the home during work or when one wing remains active while another is under construction.
What builders and homeowners should send before quoting
Strong quote prep improves both pricing accuracy and schedule confidence. Send one wide room photo, one medium shot showing boundaries and transitions, one close detail of any known substrate concern, and one angle image showing dominant light direction. If scope includes an addition tie-in, include where new framing meets existing walls or ceilings.
Also share practical constraints: occupancy status, stair/parking access, desired painter start window, and any known deadlines tied to move-in or inspections. These details influence sequencing decisions far more than people expect, and they usually reduce change-order risk when captured upfront.
Neighborhood and route context for New Albany projects
From Spring Street corridors to Grant Line and Charlestown Road access routes, New Albany projects vary in staging complexity. Some jobs have straightforward material access and broad setup zones. Others involve tighter lots, mixed-traffic streets, or occupancy constraints that require phased delivery and room-by-room execution. Installation planning should match those realities.
For clients coordinating with Louisville-side trades and river crossings, timing around I-64 patterns and crew sequencing windows can also influence day-one productivity. Including this context in the plan keeps expectations realistic and reduces first-day friction.
New Albany drywall installation planning FAQs
When should drywall be scheduled on a New Albany remodel?
Schedule drywall after framing corrections, rough-ins, and moisture checks are complete. Starting too early usually creates rework when other trades reopen walls.
How do I decide Level 4 vs Level 5 in a remodel?
Use Level 5 in rooms with strong side light, dark paint, or higher sheen. Level 4 is often suitable for lower-contrast walls with forgiving lighting and flatter paint.
What should be included in a drywall handoff before paint?
A good handoff includes patch/transition completion, texture blending, final sanding and cleanup, plus a walk-through under real room lighting before primer.
Does Mudline install drywall for additions and partial remodels in New Albany?
Yes. Mudline handles drywall installation, repair transitions, and paint-ready finishing for New Albany remodels, additions, and occupied-home projects.
Final takeaway
New Albany drywall installation success is mostly a sequencing outcome. Get framing and rough-in checks done first, choose board layout intentionally, match finish level to lighting risk, and define paint-ready handoffs with clear checkpoints. That approach protects quality, controls schedule drift, and gives both builders and homeowners a cleaner path from open framing to finished walls.
Planning drywall installation in New Albany? Send photos and project details and Mudline will provide a written quote and sequencing plan within one business day.