Crescent Hill is one of those Louisville neighborhoods where drywall repair quality shows fast. Many homes near Frankfort Avenue, Brownsboro Road, and side streets toward Cherokee Park have wall histories that are layered: old patches, repaint cycles, occasional plaster transitions, and newer mechanical or fixture updates cut into original finishes. A patch can look acceptable while work lights are on, then stand out clearly once daylight and lived-in room angles take over.
That is why texture matching in this part of Louisville should be treated as finish planning, not just hole closing. The target is not theoretical perfection from six inches away. The target is visual consistency when someone walks into the room, sits on the couch, or turns on evening lights. When repair scope is built around those real viewing conditions, callbacks drop and paint results stay cleaner.
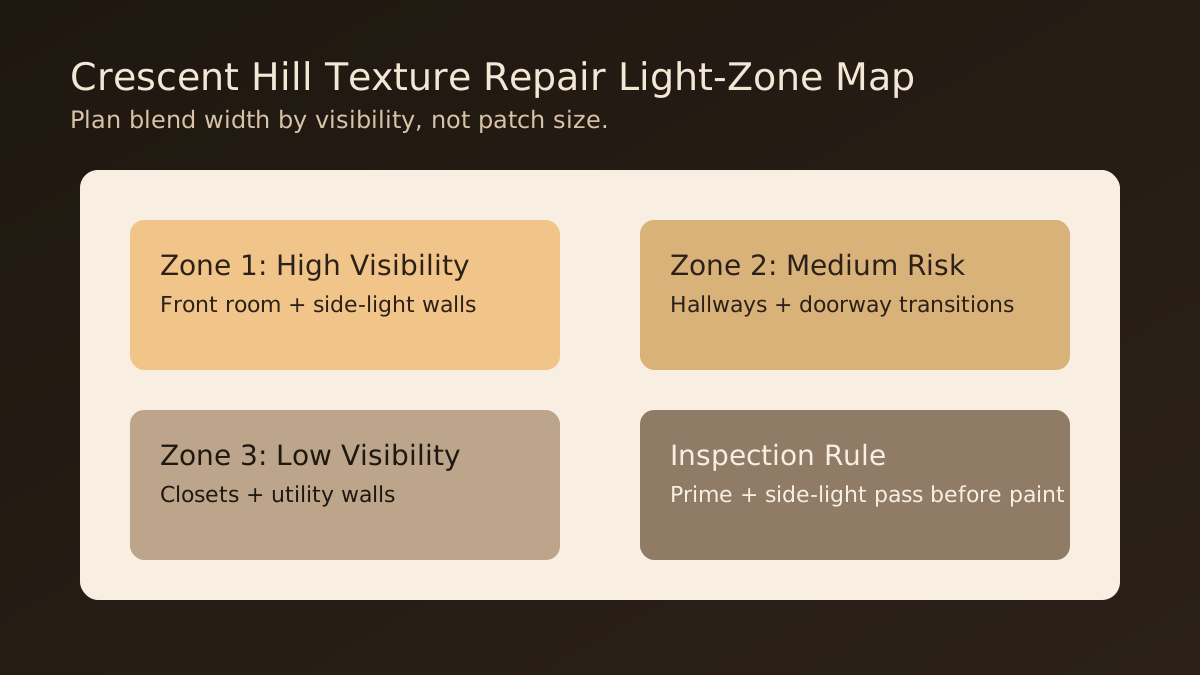
Why many texture repairs fail at the transition line
Most failed patch visuals do not come from the center of the repair. They come from the transition line where new texture meets existing wall field. If that edge is too sharp, too narrow, or too different in density, the eye catches it immediately after paint. In Crescent Hill homes with broad front-room walls and strong window angles, this effect is amplified.
Good transitions are planned wide enough for the wall context. A small closet repair can often stay localized. A living-room patch across from tall windows usually needs a broader blend zone and an extra primer truth-pass before final paint. This difference in scope is not overbuilding—it is matching effort to visibility risk.
Common Crescent Hill wall conditions that change repair strategy
Neighborhood housing stock matters. In older sections around Payne Street and nearby blocks, you may see partial plaster remnants, prior skim passes, or slight plane drift where different eras of work meet. In updated homes, you may see smooth-wall expectations paired with brighter LEDs and cleaner sheens. Each combination changes how aggressively a repair line telegraphs.
That is why texture names alone are not enough. “Orange peel” or “knockdown” tells part of the story, but not the whole one. The more useful diagnostic is: how does this wall react under side light, what is the existing paint build, and where does the eye rest in normal use? Those answers drive blend width, skim decisions, and inspection sequence.
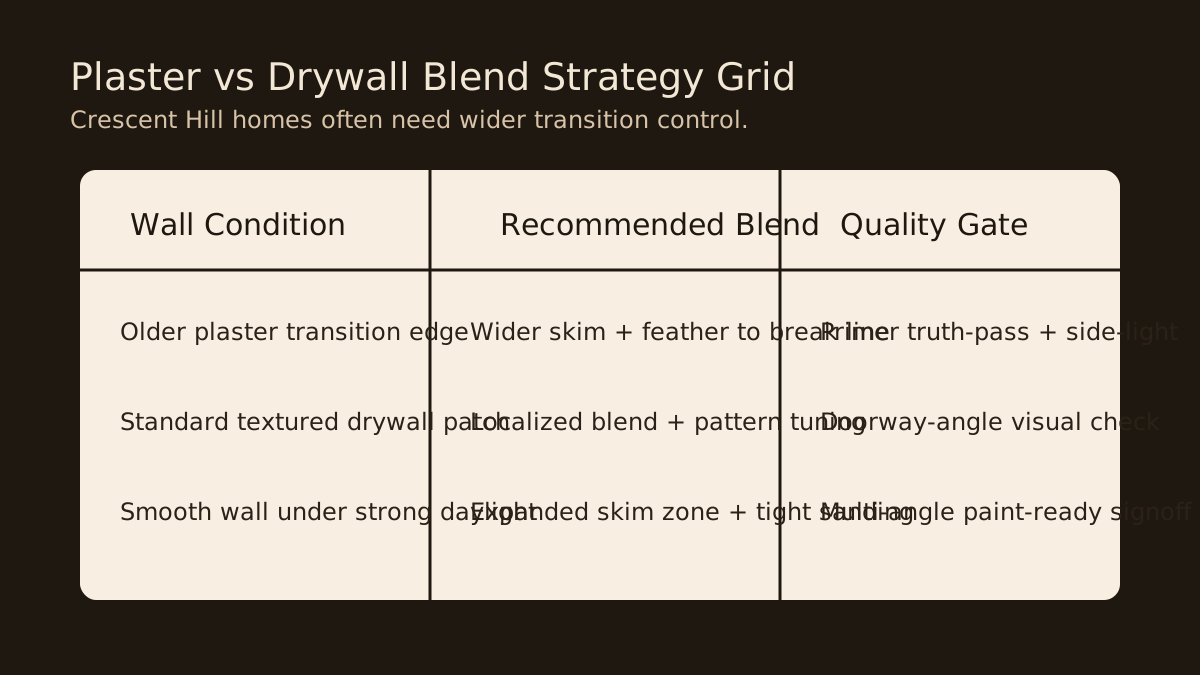
Side-light checks should be scheduled, not improvised
One of the biggest process wins is setting side-light checks as fixed gates. If inspection only happens head-on, teams can miss ridges and shallow halos that appear immediately when sunlight rakes across the wall. In Crescent Hill rooms with large window exposure, that is a recipe for post-paint disappointment.
A practical gate sequence is straightforward: substrate check, coat build, initial texture calibration, dry, primer, side-light pass, touch-up, then final paint handoff. This keeps trades aligned on what “paint-ready” really means and prevents scope ping-pong in the final stretch.
Repair planning for orange peel, knockdown, and near-smooth finishes
Orange peel repairs usually hinge on droplet sizing, spacing, and how far the blend feather extends beyond the patch. Knockdown repairs add another variable: the flattening pass must match timing and pressure to surrounding texture behavior. Near-smooth or smooth walls are less forgiving because there is no profile noise to hide transition drift.
In higher-visibility rooms, broader skim support often performs better than tiny spot blending. It sounds like more work, but it often saves time compared with repeated touchups after primer and paint reveal the same transition ring. The right approach is the one that remains quiet from normal viewing distance across daytime and evening light.
If a wall gets strong afternoon light from one side, inspect from the opposite corner and doorway before calling the repair complete. That angle catches transition lines fastest.
How to quote texture matching with fewer surprises
Clear quoting starts with better intake. For Crescent Hill jobs, helpful inputs include room photos from straight-on and side angles, approximate patch dimensions, known moisture history, and whether the wall has prior repair layers. If the room faces strong daylight, mention the direction and time of day when the wall looks worst.
This context changes the scope recommendation. A small utility patch may need localized work only. A front-room patch across a long, lit wall may justify wider blending and extra inspection passes. Getting that right in the quote prevents late expectation drift and helps keep timelines predictable for both homeowner and painter.
Dust control expectations without overpromising
Drywall is a dusty process—we do not pretend otherwise. Texture matching and sanding create fine particulate, even when work is carefully managed. The job is to contain and control it with plastic isolation, floor protection, cleanup rhythm, and sensible staging.
For occupied Crescent Hill homes, this matters just as much as finish quality. Honest scope language should include what containment is planned, what rooms are impacted, and what “managed dust” means in practical terms. That transparency builds trust and keeps expectations realistic before work begins.
A repeatable room-check workflow before paint handoff
When repairs are complete, run a short repeatable walkthrough: doorway view, seated-height view, side-light view, and trim-transition view. Note anything that catches attention immediately. Then assign each item clearly—drywall correction, painter prep, or monitor after primer. This simple categorization avoids confusion when multiple trades are in the same space.
For remodel timelines around Crescent Hill and Clifton, this check can prevent small finish issues from turning into schedule delays. A disciplined thirty-minute quality pass often saves days of reactive patching after paint.

How painters and drywall crews can avoid handoff friction
Most paint-ready disputes happen when two true statements collide: the drywall crew believes the repair scope is complete, and the painter sees a surface that still needs visual refinement under the selected sheen. Both can be right if acceptance criteria were never aligned. A better approach is to define handoff language before the last coat cycle. Decide whether a room is being signed off for primer-only review or for full finish-paint readiness under normal light. That distinction prevents last-minute surprises and keeps schedules stable.
On Crescent Hill remodels, this matters because room conditions vary so much within the same home. A hallway transition may be forgiving, while the adjacent front room wall catches every lateral light shift. If one checklist is used for both spaces, quality drift is almost guaranteed. The strongest projects use room-level notes: finish expectation, paint sheen assumptions, and any critical viewing lines that must pass before handoff. Clear notes reduce rework loops and keep trade relationships cooperative.
Choosing repair boundaries that match architecture
Repair boundaries should follow architecture whenever possible. Corners, casing lines, panel breaks, and natural visual stops help hide blend transitions better than arbitrary rectangles around damaged areas. When boundaries are chosen only by patch size, the finished wall can read like an isolated correction even if the workmanship is solid. In older Crescent Hill interiors with trim character and varied room geometry, architectural boundaries are especially useful because they give the eye a logical place to reset.
This does not mean every repair becomes whole-wall scope. It means the boundary decision should be deliberate. In practical terms: if a patch sits in a broad uninterrupted plane under side light, expand the blend to the next sensible break. If the patch sits near a doorway or trim return, use that feature to anchor the transition. This one decision often improves final appearance more than any single texture setting.
Moisture history and substrate stability checks before texture work
Texture matching should never outrun substrate readiness. If a wall has water history, even a small amount of remaining moisture can change how compound cures, how sanding behaves, and how primer reveals the surface. In Crescent Hill basements, bathrooms, and exterior-facing walls, confirm that the moisture source is resolved and the area is stable before final texture sequencing. Otherwise a patch can look right for a week and then telegraph edges as conditions shift.
Substrate stability also includes fastener integrity and board plane consistency. If underlying movement is still active, no texture finish will permanently hide it. A short pre-finish diagnostic—moisture check, fastening check, plane check—prevents cosmetic work from being asked to solve structural or environmental issues. That keeps quotes honest and outcomes more durable.
A practical homeowner checklist for post-repair confidence
Homeowners often ask how to evaluate a repair without overanalyzing every square inch. A practical checklist helps: view the wall from normal room entry points, check in daytime and evening light, and note whether the repair calls attention to itself from typical living distance. If you have to hunt for the patch under realistic conditions, the finish is usually in a good place. If your eye lands on it immediately from common viewpoints, request a correction pass before final paint signoff.
It also helps to align expectations around touchups. Minor punch work is normal near project end, especially when primer reveals subtle transitions. The key is whether those items are identified and resolved before final acceptance, not whether every surface looked perfect at every intermediate phase. A transparent checklist keeps expectations fair and reduces stress during closeout.
Final takeaway
In Crescent Hill, good texture matching is less about one spray setting and more about process discipline: wide-enough blend zones, side-light verification, substrate-aware transitions, and honest handoff standards. Done well, repairs stay visually quiet after paint instead of reappearing as callbacks.
Need drywall texture matching in Crescent Hill or nearby Louisville neighborhoods? Send us photos and room details and we will provide a written quote within one business day.